Wednesday, March 31, 2021

From The Bottom Of My Heart, Thank You By Marj Banzales


How are you friends? Hope all is well and I'm glad you stop by. I'm back again for another card inspiration using this month's Exclusive Rainy Days. I hope you get the chance to stop by Oddball Website to check out this amazing stamp set and some other stamp sets.

I love this stamp set so much that's why I decided to make several cards this month, Can't you tell? This stamp set can be made with your desired sizes from mini, medium or even large to occupy the whole front of your card using one or 2 digital stamps.


For today's card, I used 2 of the digital stamp from the March Members Exclusive. This is how I sketch the card before making them and it turned out how I planned it. I made several sketches before making a decision which one should I make and this one is the winner among the sketches I made.

First, I cut a piece of Kraft cardstock 4.25 x 5.5 inches as my card panel then another piece of White cardstock, 4 x5.25 inches for my card base. I used the card base to make my background. It is a simple background, I used Ranger Distress Oxide Inks Rusty Hinge and Brushed Corduroy. I blended these 2 Distress Oxides on all sides of my card base and then blended them well to achieve a soft and well blended combination.  We all know when we do this technique, the inks doesn't leave our brushes right away and it leaves for a little bit unless we clean it right away. So I decided to blend it softly to the whole white page to compliment the color on the side and I'm glad I did. It blended so well and I really like how it turned out.


The background was kind of blank even with colors so I decided to just add some streaks to make a little texture and I am happy I did because I did not even think that I will like it.

Then, I printed my image and colored them using Arteza Colored Pencils. This color pencil really blend so well and very soft but not that soft that it will break. It is such a very high end colored pencils with just a fraction of a price. I really love using them on all my cards even just for a little bit or hightlight.

After coloring these two images, I added a couple of foam tapes on each and added them to the left side of the card. The sentiment is from Simon Says Stamp Hello Darling Stamp Set. stamped it on a black cardstock using Scrapbook.com White Pigment Ink and let it dry for a couple of minutes before adhering it on my card front. Lastly, I added a few of Studio Katia's Confetti and we are all done!


I know this too long for some details but I just want to give you all the deets I just in case you wanted to make one, two or more of this card.

I hope you like it and were inspired. I have a coupon code for you to use DTMARJ10, 10% OFF any image in the Oddball Website. I highly recommend you subscribe to the Ghoul Plans so you can take advantage of the Weekly and Monthly Exclusives.

Till next time!

XOXO

Marj


Sunday, March 28, 2021

Just For You By Marj Banzales


Hey friends! I'm back again for another Project Inspiration from Oddball. This digital stamp is very versatile that you can use anytime not just during Spring. It can be for birthdays, thank you, love and so much more.


For this card, I'm featuring the March Members Exclusive 2021 Rainy Days. I printed and colored them using my Arteza Colored Pencils. I love this colored pencils as it is very gorgeous and so easy to blend. I colored them with different combinations of Yellow for the pots and Greens for the cactus. After coloring each images, I fussy cut them with a little white border for some definition. I always leave a white border that shows how beautiful the image is. Well, probably that's just me! But believe me when I say, this March Members Exclusive 2021 is definitely gorgeous!


Next, I made my background by using a few of the Ranger Distress Oxides. I didn't like it at first but then after few more blends it came out what I was trying to imagine in my head. Soft and beautiful blend. After making the background, I took another piece of cardstock and added some Distress Oxides on the side just for a little color.  After that,  as I don't have the size of a Nesting Hexagon Die,  I used  my Fiskars Hexagon Punch and punch it 3 times. Then, I attached it to the background I made using wet glue.

I added some foam tape to the back of my images and attached it to the front where the Hexagon Punch is located and then attached it to the Yellow card base. Finally,  for my sentiment, I used Simon Says Stamp Sketch Tulip Bouquet using the Scrapbook.com white Pigment Ink on a piece of Black Cardstock and used my heat tool to dry the ink. 

I hope you like what I made today and learned a little bit of how I process in making this card.

Don't forget to stop by Oddball Website to check their Ghoul Plans wherein you can receive the Members exclusive when you subscribe. You can also take advantage of 10% OFF by using my coupon code DTMARJ10!

So don't wait too long so you won't miss the Creepy Cute Digitals from Oddball.

See you again next time!

XOXO
Marj


Saturday, March 27, 2021

Spring Cleaning Checklist using CCC 145

 Hey Crafty Creeps!

Celia from Paper Beats Rock Designs here to share a quick tutorial using this week's edition of the Creepy Cute Chronicles: #145 Spring Cleaning! I also printed Patty Cake stamp #18 and the Broom from CCC Monthly Exclusive from September 2020.

First, I colored them all up using my alcohol markers and fussy cut them out. The dust clouds were a little tricky to cut out, but not impossible with small, sharp scissors.

Then I went to my organization binder, grabbed some graph paper and glued the girls down in the corners.

After a little contemplation on what my houses problem areas are, I used an Amy Tan alpha and alpha roller stamp to create my title and subheaders.

Then I glued down my lil dust clouds to act as my main bullet points. I'm not sure about you, but making my calendar and organizer pretty keep me going with them and on track.

Thursday, March 25, 2021

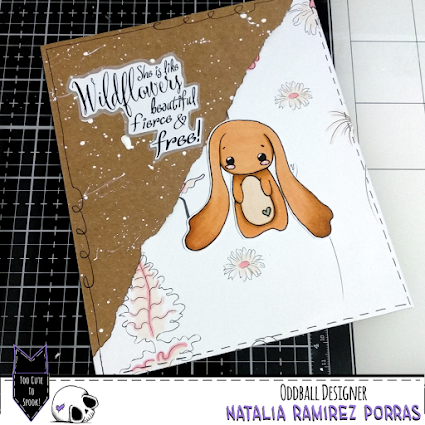
HAPPY SPRING CARD


Hello Oddballers! 


I´m Natalia (@la_maleta_encantada_scrap). A pleasure to see you here again😄.


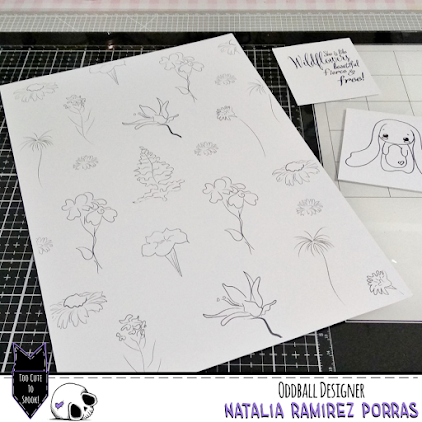
Today I´ve created a sweet CARD for you with the Kawaii Bunny IMG 97 digital and Whimsical Set Of Wildflowers IMG 449.


You can find it on: 


https://www.oddballartco.com/product-page/printable-stamp-kawaii-bunny-digital-download-image-no-97

https://www.oddballartco.com/product-page/digital-stamp-whimsical-set-of-wildflowers-w-inspiring-quote-image-no-449 


List of supplies:


+ IMG 97 and IMG 449.

+ Ohuhu alcohol markers.

+ Kraft paper.

+ Black permanent (Micron).

+ Vellum paper.

+ White cardstock.

+ White Gesso.

+ Cut and glue basics.


Now, I´ll explain you how I´ve made this card:


* Step 1: I´ve made a collage paper with IMG 449 and I´ve printed both digital stamps.


* Step 2: I´ve colored IMG 97 with Ohuhu alcohol markers and cut both digital stamps (IMG 97 and IMG 449).


* Step 3: Cut a piece of Kraft paper (5 1/2 by 6 1/2 inches).


* Step 4: I´ve added some white gesso splatters.


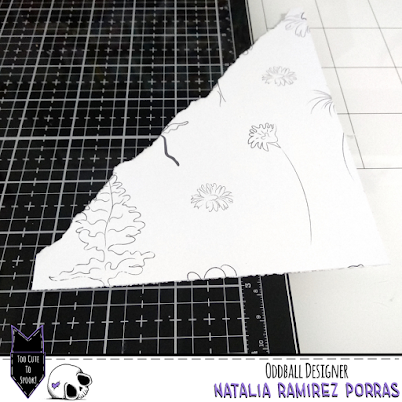
* Step 5: I tear a collage paper and apply glue.


* Step 6: I glue IMG 97 on top of the vellum and cut making an edge. Then, I color some part of wildflowers.


* Step 7: Finally, I´ve glued the IMG 97 and I make a border on the card with a Micron to create a frame.


I hope you liked this creative project and I encourage you to create one and tag us on our social networks.


REMEMBER! You can use my code DTNAT1 if you would like to buy 2 

digital stamps and get 1 free on Oddballartco.com. And you can share

your projects with #creepycutechronicles on Instagram and on Facebook

and Wix group.


See you soon spookers!


Natalia 💜 


Web Oddball Art Stamps: https://www.oddballartco.com/


Visit me:

Instagram : https://www.instagram.com/la_maleta_encantada_scrap/

Facebook: https://m.facebook.com/lamaletaencantadascrap/?locale2=es_ES

Youtube: https://www.youtube.com/channel/UCqvaQgT5Lv0InriJeEhWYmA

Halloween profile: https://www.instagram.com/p/CA81owjnB7x/?igshid=wzxqj0bfxtmt  


Wednesday, March 24, 2021

❤ Towards the Rainbow..and beyond❤ a card by ilCiecoFuffo

 Hello to all Creepy Girl today I will tell you about this very special card for me. I often make cards just for fun, other times for a friend's birthday, other times to thank or greet someone, other times very rare fortunately, to enclose very strong feelings that I can't express. This card is part of this last group. I agreed with Lizzy on a card full of flowers but HER came out of my heart .. and I dedicate it to my Cousin Anna who flew over the rainbow on March 19th due to a bad disease.

This stamp, in my opinion beautiful, made me imagine her leaving this land finally light and painless, for this reason the balloons can lift her over the rainbow without difficulty, with her heart suspended to leave us her. love here, for us.

and more digital stamp:

MEMBERS EXCLUSIVE MARCH 2021 RAINY DAYS Creepy Cute Chronicles

Free digital "Skull and heats" on Group FB

In this card I experimented, I took a step further in my coloring, changing the coloring of the skin of the face and giving the balloons a different vision of the light and shadow points (I was inspired by an artist who I follow a lot hehehehehe, but on the other hand you have to learn from someone right?).

First of all, I designed the card on the PC and then I printed it on paper for markers. I cut it to make it a slim card, following the proportions of the magical Werner shared with us, yes a part of the design is cut, but the effect is desired!
Next step is the coloring ...
and again after masking to color and create the background
To create the background I first blended a Spun Sugar distress oxide and then Worn Lipstick but spread over a stencil (Echo Park-Classy Fan Stencil ... wonderful !!!) to give, as well as color, a texture to the background.
When I finished spreading my pinks, I removed the masking and with a radiant sun stencil I created sparkles above and around the heart; I then added details with the white gel pens and finally made the frame with a Bazzil sheet.
And that's all dear Creepy Girls for this post, I wait for you as always below for the comments ❤
Random kisses from yours
CiecoFuffo

Tuesday, March 23, 2021

Are they Snowdrops?


Here are today's makes for Oddball Art Co - Our Oddball theme for this month is 

Lucky Spring Days -St. Patricks Day/Spring Begins

I am using CCC144 Ghoulish Garden and when I first saw this image, I immediately thought of snowdrops!


My first idea was to make an ATC using layers of green and teal on the base.


I then printed the image on a paper from Stay Creepy adding extra colour with markers.


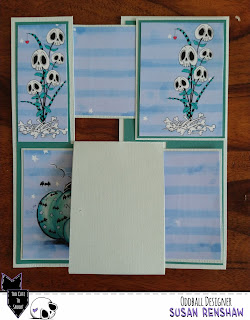
But this was only the start of today's makes... I wanted to use a similar ATC as part of an impossible card.


Step ONE

Make the card base - I actually did this on my Cricut but it is just as easy to draw it out, cut and score and fold, starting with a piece of card 6 inches by 7 inches. 


Step TWO

Score and fold the middle section so that if you twist the right hand side underneath, the base will look like this with the middle section standing up.


Step THREE

Decorate - I added the ATC to the middle.

Step FOUR

I added more of the paper on the front, matted on green - only attaching the left hand side so that the card is still foldable.

Step FIVE

This picture is from above - I added another strip across only attaching to the right hand side, and then two more of the images layered on teal and green.

Step SIX

The card will still lie flat to go in a large envelope like this (folded back to its original shape): 


Or even like this if it's easier.

You will see a similar post on the my blog, Calling all Crafters!

Here are the card and the ATC:


If you would like to buy any of Lizzy's Oddball images use my DT code: DTSUSAN10
This coupon code is for 10% OFF the entire Oddball Art Website